Detecting Status Bar Taps On RN IOS


At 10Play, we are working on a hybrid react-native and WebView App, we have a native IOS app written in react-native with some native components where the main component is a WebView running our React (web) application.
When using apps on IOS, users expect a view to scroll to the top when tapping the status bar. We can achieve this on some views such as UIScrollView with the scrollsToTop property (defaults to true), this is also the case in ReactNative with ScrollView’s or FlatLists
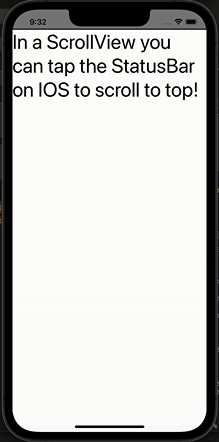
Tapping status bar, scrolls UIScrollView to top
But what happens if we have a webview displaying a scrollable component? We lose that native feeling (note: it is possible to get this to happen, but only if the scroll is on the body, otherwise this will not work). In addition, there is no out-of-the-box “statusBarPressed” event exposed on IOS so we cannot do anything manually either, but there are two ways we can solve this!
Detecting StatusBar Click from ScrollView
This method involves rendering a hidden ScrollView with the scrollsToTop prop set to true (it is true by default), then we can know if the StatusBar has been clicked by listening to the onScroll event on our scrollview, we then can use this to trigger scroll inside our webview!
So first thing first we need to render a scrollview, we also need the scrollview to be able to scroll so we assign it a height of 1 and give it content with a height of 2. Keep in mind the scroll view must be mounted and visible for this to work.
export const IOSScrollToTop = () => {
  const scrollViewRef = useRef<ScrollView>(null);
  useEffect(() => {
    // Instantly scroll to the end
    scrollViewRef.current?.scrollToEnd({ animated: false });
  }, [scrollViewRef.current]);

  return (
    <ScrollView
      ref={scrollViewRef}
      style={{ height: 1, width: '100%', position: 'absolute' }}>
      <View style={{ height: 2 }} />
    </ScrollView>
  );
};
Now we can listen to the onScroll event and be sure that when this happens, the status var was clicked
Note: we do not use the onScrollToTop prop because it only fire after the scrollview has finished scrolling.
<ScrollView
  ref={scrollViewRef}
  style={{ height: 1, width: '100%', position: 'absolute' }}
  onScroll={() => {
    console.log('Status bar clicked!');
  }}>
  <View style={{ height: 2 }} />
</ScrollView>
We still have a few problems:
- This will fire quite allot, we only need to fire it on the first scroll, we can fix this by adding a ref indicating that we already scrolled
- We will only detect the first status bar click, we need to reset the scroll to the end each time it has scroll to the top
This finally leaves us with this:
interface IOSScrollToTopProps {
  onStatusBarClicked: () => void;
}
export const IOSScrollToTop = ({ onStatusBarClicked }: IOSScrollToTopProps) => {
  const scrollViewRef = useRef<ScrollView>(null);
  const scrollWhenStatusBarTapped = useRef<boolean>(true);

  useEffect(() => {
    scrollViewRef.current?.scrollToEnd({ animated: false });
  }, [scrollViewRef.current]);

  if (Platform.OS !== 'ios') {
    // This will not work on android
    return null;
  }

  return (
    <ScrollView
      ref={scrollViewRef}
      scrollEventThrottle={16}
      onScroll={(e) => {
        // Check we dont scroll to top when we scrollToEnd
        if (e.nativeEvent.contentOffset.y < 1 && scrollWhenStatusBarTapped.current) {
          onStatusBarClicked();
          scrollWhenStatusBarTapped.current = false;
        }
      }}
      onScrollToTop={() => {
        // Once scrolled to top, reset ref and scroll back to bottom
        scrollWhenStatusBarTapped.current = true;
        scrollViewRef.current?.scrollToEnd({ animated: false });
      }}
      style={{ height: 1, width: '100%', position: 'absolute' }}
    >
      <View style={{ height: 2 }} />
    </ScrollView>
  );
Then we can use this component and it’s onStatusBarClicked prop to scroll to the top in our webview
const OurWebviewApp = () => {
  const webviewRef = useRef<WebView>(null);

  return (
    <>
      <WebView source={{ uri: OUR_URI }} ref={webviewRef} />
      <IOSScrollToTop
        onStatusBarClick={() => {
          // Status bar clicked!
          webviewRef.current.injectJavascript(`
            document.querySelector('#my-scroll-container').scrollTo({
              top: 0,
              behavior: "smooth",
            });
        `);
        }}
      />
    </>
  );
};
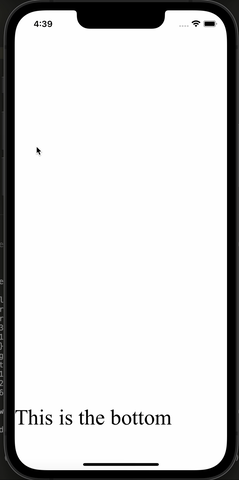
Watch it in action:
Downsides
This solution is not perfect, it is pretty hacky — actually it is very hacky but for our case it did work. Just be-aware that the scroll-to-top gesture has no effect if there’s more than one scroll view onscreen that has scrollsToTop set to true. So if you have any other scrollviews rendered this might not work for you.
You can check out the example repo here
Implementing Custom CAPHandleTapAction
This method involves updating the native IOS code, and is abit more complicated.
All we need to do to get this to work is to add the following code into our AppDelegate.m
@implementation UIStatusBarManager (CAPHandleTapAction)
-(void)handleTapAction:(id)arg1 {
    // Status bar tapped!
    NSLog(@"Status bar tapped!")
}
@end
After that you can emit a native event and capture it on the JS side (I will not go into this since it covered pretty well in the docs)
HOWEVER after doing this we will lose all of the default scrollToTop behavior on all native scrollviews in our app. If this is okay with you then you can probably just leave this as is.
There is way to keep the default behavior, using method swizzling
import <Foundation/Foundation.h>
import <objc/runtime.h>

@interface UIStatusBarManager (CAPHandleTapAction)
@end
@implementation UIStatusBarManager (CAPHandleTapAction)

+ (void)load {
    static dispatch_once_t onceToken;
    dispatch_once(&onceToken, ^{
        Class c = [self class];
        SEL originalSelector = NSSelectorFromString(@"handleTapAction:");
        SEL swizzledSelector = @selector(new_handleTapAction:);

        Method originalMethod = class_getInstanceMethod(c, originalSelector);
        Method swizzledMethod = class_getInstanceMethod(c, swizzledSelector);

        BOOL didAddMethod = class_addMethod(c,
                                            originalSelector,
                                            method_getImplementation(swizzledMethod),
                                            method_getTypeEncoding(swizzledMethod));

        if (didAddMethod) {
            class_replaceMethod(c,
                                swizzledSelector,
                                method_getImplementation(originalMethod),
                                method_getTypeEncoding(originalMethod));
        } else {
            method_exchangeImplementations(originalMethod, swizzledMethod);
        }
    });
}

-(void)new_handleTapAction:(id)arg1 {
    // call original handleTapAction
    [self new_handleTapAction:arg1];
    NSLog(@"TAP");
    // Here we would want to emit the native event
}
Downsides
I feel like this is an overcomplicated way to acheive something very simple, while this does work, method swizzling could be really hard to debug if things go wrong, and for us the first method with the hidden scrollview worked just as well.
Summary
Sometimes you need to build “hybrid” apps that involve webview and native code, this stack is often needed when building things that more easy to implement with browser like: wysiwyg editors/markdown editors, or even when you just want to save time and reuse some pages from your mobile browser app. When that happens you want to try keep the user experience as good and as ‘native feeling’ as possible, as if it wasn’t a webview because many of these small changes really do make a difference. We’re planning to write more of these hacks soon, so stay tuned 😚


